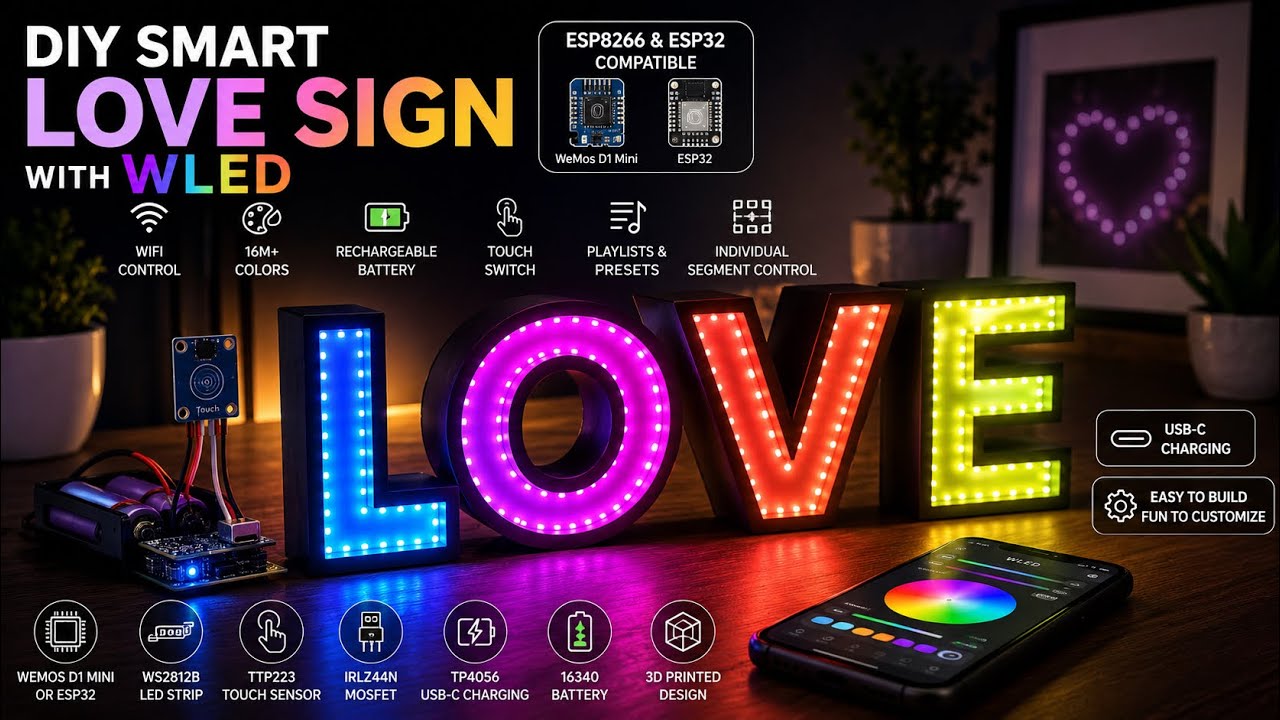
In this step-by-step tutorial, I’ll show you how to build a rechargeable smart LOVE sign using WLED, addressable WS2812B LEDs, a touch sensor, and a custom 3D-printed enclosure.
This project is fully compatible with both ESP8266 (WeMos D1 Mini) and ESP32 development boards, allowing you to choose the controller that best fits your needs.
Using WLED, you can wirelessly control colors, brightness, effects, presets, playlists, and animations directly from your smartphone, tablet, or computer.
✨ Features:
✔ ESP8266 & ESP32 Compatible
✔ WLED Wireless Control
✔ Individual Letter Control (L, O, V, E)
✔ Custom Segments for Each Letter
✔ Presets & Playlists
✔ Touch Sensor ON/OFF Control
✔ Rechargeable Battery Powered
✔ USB-C Charging
✔ Custom RGB Effects & Animations
✔ Fully 3D Printable Design
✔ No Coding Required After WLED Installation
🛠 Components Used:
- WeMos D1 Mini (ESP8266) or ESP32 Development Board
https://s.click.aliexpress.com/e/_c3okzHFf
https://s.click.aliexpress.com/e/_c32FSWRF - WS2812B Addressable RGB LED Strip (1 Meter, 60 LEDs)
https://s.click.aliexpress.com/e/_c3mQjD0t
https://s.click.aliexpress.com/e/_c4tw32YV - TTP223 Capacitive Touch Sensor Module
https://s.click.aliexpress.com/e/_c4LGCqpf
https://s.click.aliexpress.com/e/_c4XsA8u5 - IRLZ44N N-Channel MOSFET
https://s.click.aliexpress.com/e/_c3AfYl6H
https://s.click.aliexpress.com/e/_c4mVqPM1 - TP4056 USB-C Charging & 5V Boost Module
https://s.click.aliexpress.com/e/_c2vw4YaZ
https://s.click.aliexpress.com/e/_c42KP5wN - 2 × 16340 Rechargeable Li-ion Batteries (3.7V, 2800mAh)
https://www.aliexpress.com/item/1005007513350565.html - 1 × 10kΩ Resistor• 1 × 270Ω Resistor
https://s.click.aliexpress.com/e/_c4PtrE1B
https://s.click.aliexpress.com/e/_c3VxPAbL - USB Type-C Female Connector
https://www.aliexpress.com/item/1005006044405766.html - 22 AWG Hook-Up Wire
https://s.click.aliexpress.com/e/_c3xoWpvb
https://s.click.aliexpress.com/e/_c3Gm8PUp - 3 × M3 × 12 mm Screws
- Heat Shrink Tubing
https://s.click.aliexpress.com/e/_c3UNi8ZX - Hot Glue
📚 What You’ll Learn:
- Installing WLED on ESP8266 or ESP32
- Configuring LED Segments
- Creating Individual Letter Presets
- Building Custom Playlists
- Connecting a Touch Sensor
- Setting Up a Rechargeable Battery System
- USB-C Charging Integration
- WLED Configuration and Control
- Final Assembly of the 3D Printed Enclosure
🌈 WLED Features Demonstrated:
- Segment Configuration
- Preset Creation
- Playlist Setup
- Effect Selection
- Brightness Control
- Color Management
- Wi-Fi Connectivity
- Automatic Startup Playlist
📥 STL Files:Download the STL files and build your own LOVE sign.
https://makerworld.com/en/models/2881800-smart-love-sign-with-wled#profileId-3218673
Whether you’re using an ESP8266 or ESP32, this project is a great introduction to WLED, addressable RGB LEDs, DIY electronics, and 3D printing.
If you enjoyed this project, please Like, Share, and Subscribe for more DIY electronics, WLED projects, ESP32 tutorials, and 3D printing builds.
Thank you for watching ❤️