Achieving flawless 3D prints requires more than just a good printer—it demands a solid understanding of common printing issues, proper calibration, and smart troubleshooting techniques. Many users spend countless hours and waste valuable filament trying to solve print failures through trial and error, when most problems can be fixed quickly by identifying their root causes.
In this comprehensive guide, you’ll discover the most common FDM 3D printing problems, their underlying causes, and proven solutions to fix them. We’ve also included practical troubleshooting tips and optimized settings to help you improve print quality, reduce material waste, and get consistently reliable results from your 3D printer.
Under-Extrusion: Why Isn’t Your 3D Printer Extruding Enough Filament?
Under-extrusion occurs when the printer fails to deliver the required amount of filament, resulting in weak layers, gaps, poor surface quality, and reduced part strength. The most common causes include a partially clogged nozzle, insufficient flow rate, incorrect extrusion settings, or issues within the filament feeding system.
To resolve this issue, start by inspecting and cleaning the nozzle, then increase the flow rate in your slicer by approximately 5% and perform a test print. Also ensure that the filament moves freely through the extruder and Bowden tube without excessive resistance.
3dRD-Specific Solution:
Inspect the extruder drive gear for wear or accumulated filament debris. A worn gear can slip during printing and cause inconsistent extrusion. Replace the gear if necessary to restore smooth and reliable filament feeding.
Over-Extrusion: How to Fix Excessive Filament Output
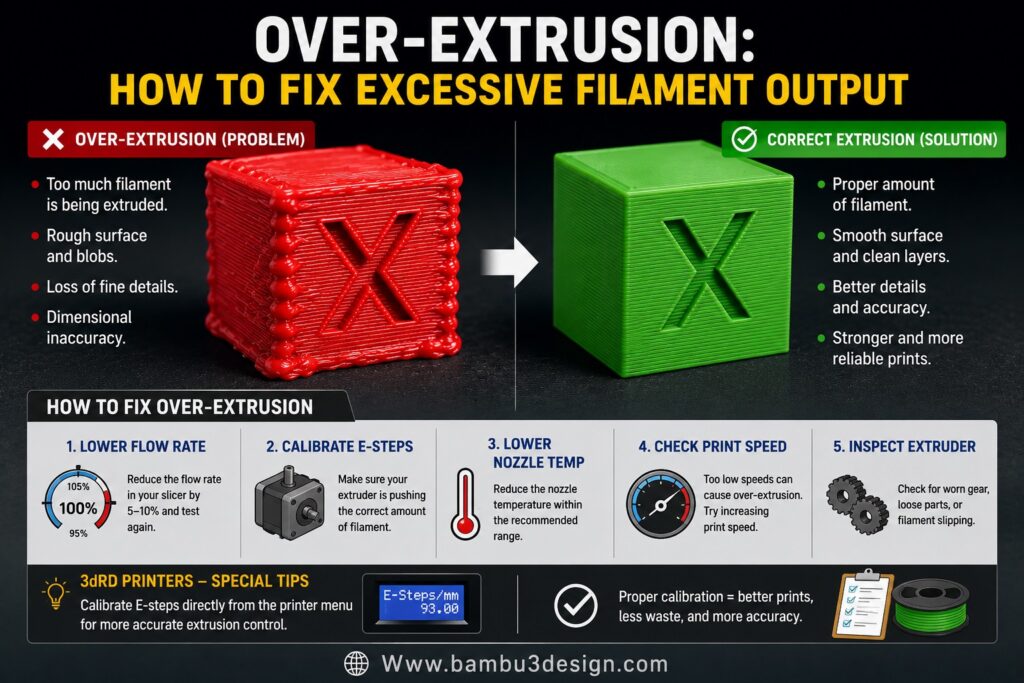
Over-extrusion happens when the printer pushes more filament than required, leading to rough surfaces, dimensional inaccuracies, blobs, and poor detail reproduction. This problem is typically caused by excessive nozzle temperatures, incorrect flow settings, or improperly calibrated E-steps.
The first step is to reduce the flow rate slightly and lower the nozzle temperature within the recommended range for your filament. Running a calibration cube can also help identify excessive material deposition.
3dRD-Specific Solution:
Calibrate the E-steps directly from the printer settings menu. Accurate E-step calibration ensures the extruder feeds exactly the intended amount of filament, improving print quality and dimensional accuracy.
Stringing: How to Eliminate Unwanted Filament Threads
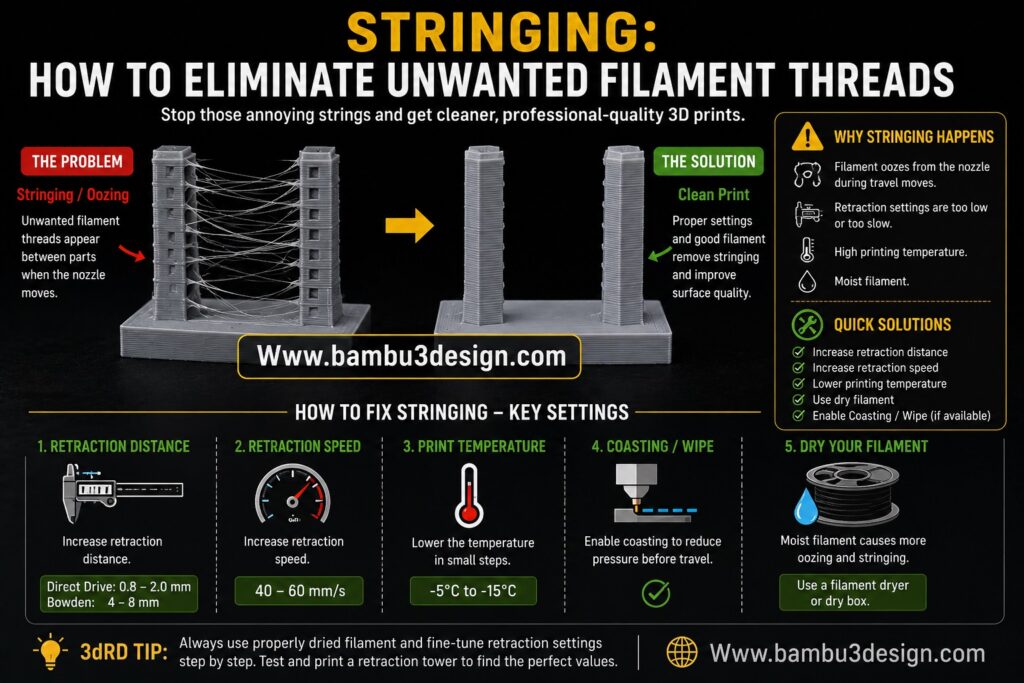
Stringing is one of the most common 3D printing defects and appears as thin strands of filament stretched between separate parts of a model. It occurs when molten filament leaks from the nozzle during travel movements due to inadequate retraction settings or excessive filament moisture.
To reduce stringing, increase the retraction distance and speed, optimize travel settings, and lower the printing temperature if necessary. Testing a retraction tower can help determine the ideal values for your setup.
3dRD-Specific Solution:
Always use properly dried filament. Moisture absorbed by the filament significantly increases stringing and surface defects. Storing filament in a dry box or using a filament dryer can dramatically improve print quality.
Bed Adhesion Failure: Why Doesn’t the First Layer Stick?
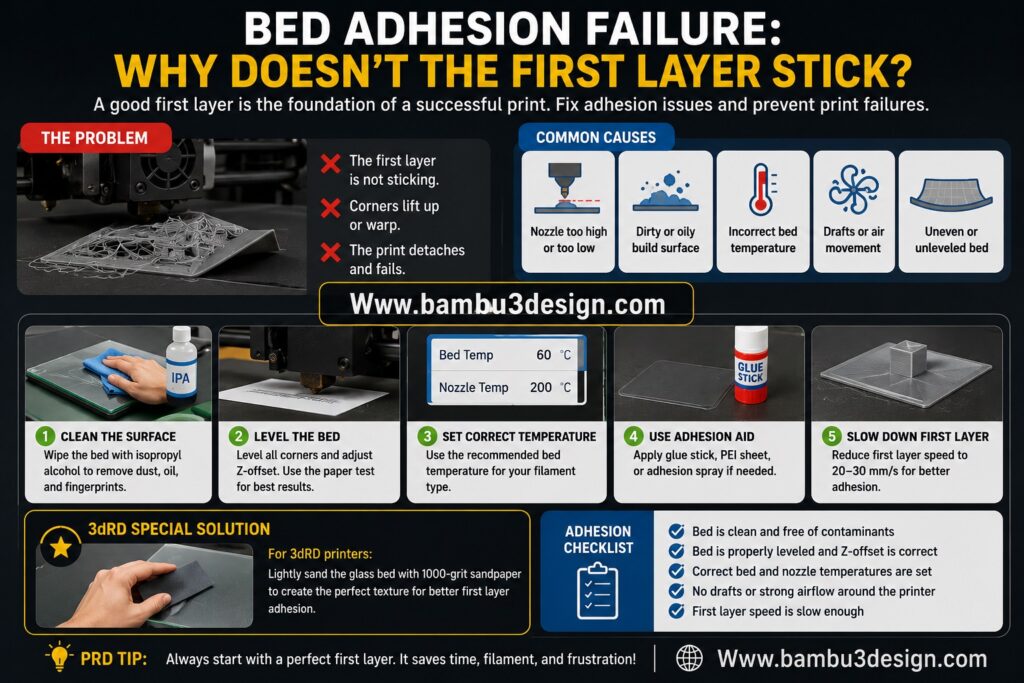
Poor bed adhesion is one of the leading causes of failed prints. When the first layer does not bond properly to the build surface, prints can detach, warp, or fail entirely. Common causes include an unlevel build plate, incorrect Z-offset, insufficient bed temperature, or contamination from dust, grease, and fingerprints.
To improve adhesion, thoroughly clean the build surface with isopropyl alcohol (IPA), verify bed leveling, adjust the Z-offset, and use adhesives such as glue sticks or specialized adhesion sprays when necessary.
3dRD-Specific Solution:
For glass build plates, lightly polish the surface using 1000-grit sandpaper to create a micro-textured finish. This improves mechanical grip and significantly enhances first-layer adhesion without damaging the bed.
Warping: Why Do 3D Prints Curl and Lift from the Build Plate?

Warping occurs when printed layers cool and contract unevenly, creating internal stresses that cause the edges of a model to lift away from the build plate. This issue is especially common when printing temperature-sensitive materials such as ABS and ASA, particularly in environments with drafts or fluctuating temperatures.
To minimize warping, use a brim or raft to increase bed adhesion, maintain a stable ambient temperature, and avoid exposing the print to sudden airflow. An enclosure can significantly improve results when printing engineering-grade materials.
3dRD-Specific Solution:
Keep the heated bed at the recommended temperature throughout the print and, when dimensional requirements allow, consider using PLA filament, which is less prone to thermal contraction and warping.
Layer Shifting: Why Are Layers Misaligned During Printing?
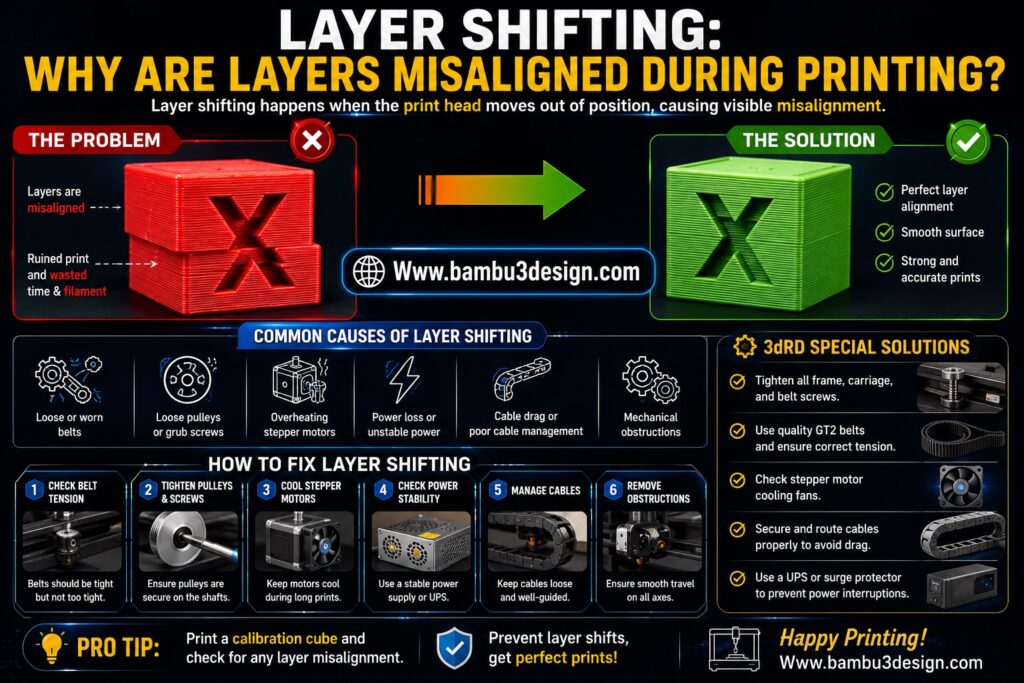
Layer shifting occurs when one or more layers are printed offset from their intended position, resulting in a distorted model. This problem is usually caused by loose belts, excessive vibrations, motor skipping, or mechanical resistance in the motion system.
Begin troubleshooting by inspecting and tightening the X- and Y-axis belts, ensuring all pulleys are firmly secured, and reducing excessive print speeds if necessary. Also verify that no obstructions are interfering with printer movement.
3dRD-Specific Solution:
Lubricate the linear bearings and guide rods using lightweight machine oil such as sewing machine oil. Proper lubrication reduces friction, improves motion accuracy, and helps prevent unexpected layer shifts.
Nozzle Clogging: How to Clear a Clogged 3D Printer Nozzle
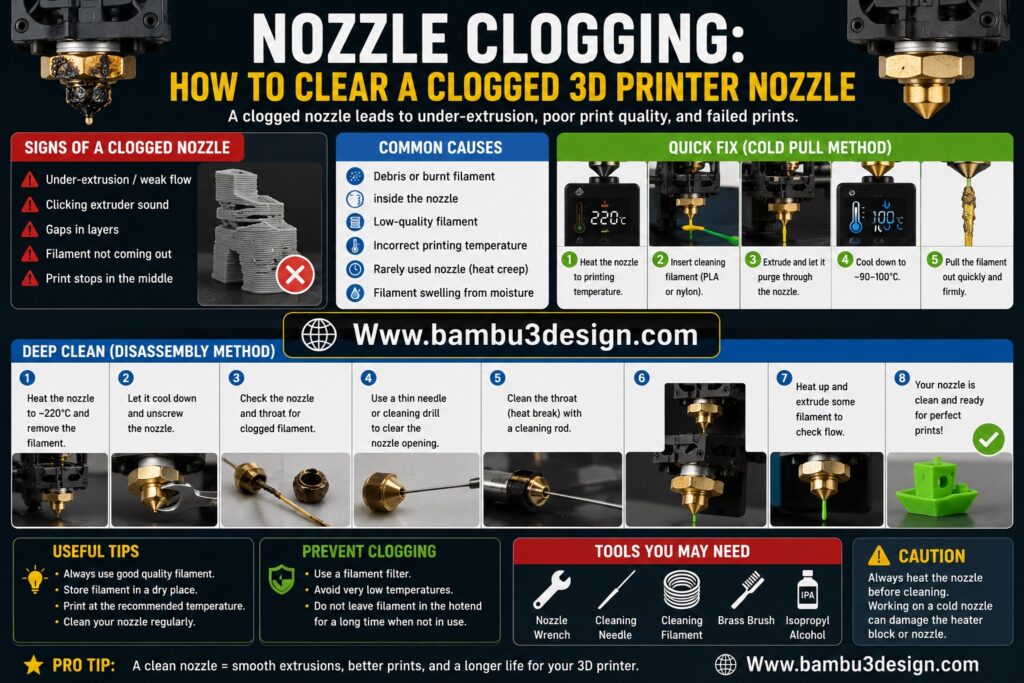
A clogged nozzle restricts filament flow and can lead to under-extrusion, missing layers, or complete print failure. The most common causes include low-quality filament, dust contamination, burnt filament residue, or prolonged operation at unsuitable temperatures.
The recommended first step is performing a cold pull to remove debris and carbonized material from the nozzle. If the blockage persists, inspect the hotend assembly and verify that the filament path is clean and unobstructed.
3dRD-Specific Solution:
Replace brass nozzles approximately every 100 printing hours, especially when printing abrasive materials. Regular nozzle replacement helps maintain consistent extrusion and reduces the likelihood of recurring clogs.
Layer Gaps: Why Are There Visible Gaps Between Printed Layers?
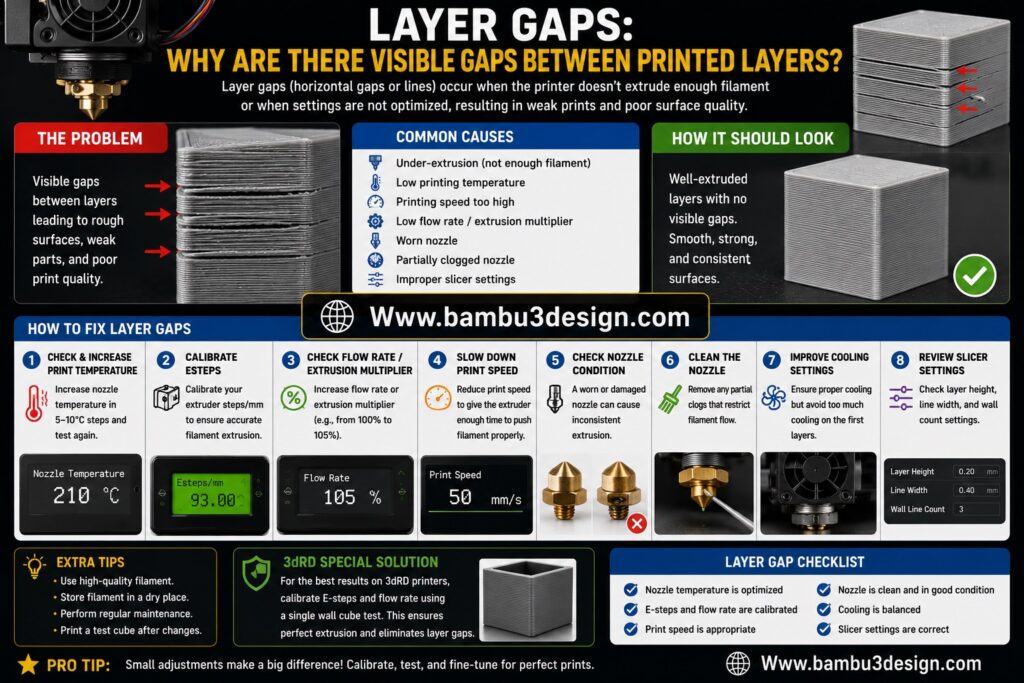
Layer gaps appear when adjacent extrusion lines or layers fail to bond properly, leaving visible spaces within the print. This issue is commonly caused by low nozzle temperatures, insufficient flow rates, excessive print speeds, or inaccurate extrusion calibration.
To improve layer bonding, increase the printing temperature within the filament’s recommended range, reduce print speed, and verify that extrusion settings are properly calibrated. These adjustments promote stronger fusion between layers and improve overall print strength.
3dRD-Specific Solution:
Increase the Infill Overlap parameter in your slicer settings. A higher overlap value improves the connection between infill structures and outer walls, resulting in stronger parts and fewer internal gaps.
Overheating: Why Are Your 3D Prints Melting or Losing Detail?
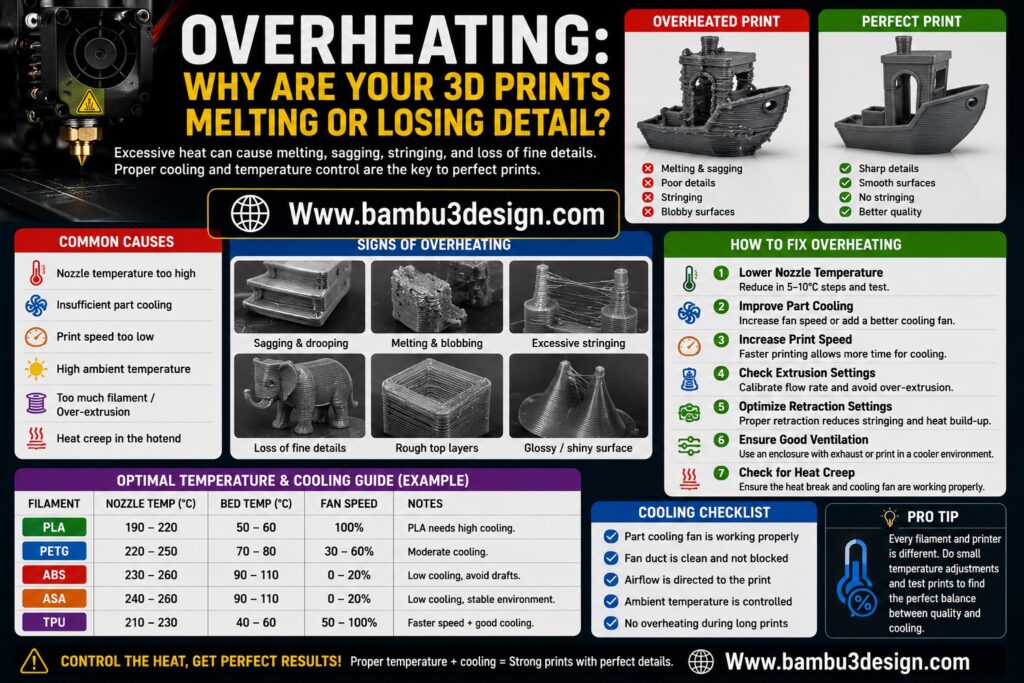
Overheating occurs when printed layers do not have enough time to cool before new layers are deposited. As heat accumulates, surfaces can become soft, corners may deform, and fine details can lose their shape. This problem is particularly common in small models or when part cooling is insufficient.
The first step is to inspect the part-cooling fan and ensure it is operating correctly. Increasing the minimum layer time or reducing print speed can also give each layer more time to cool and solidify properly.
3dRD-Specific Solution:
Replace the stock cooling fans with high-quality ball-bearing fans. These fans provide better airflow, longer service life, and more consistent cooling performance, resulting in improved print quality.
Poor First Layer: Why Is the First Layer Failing?
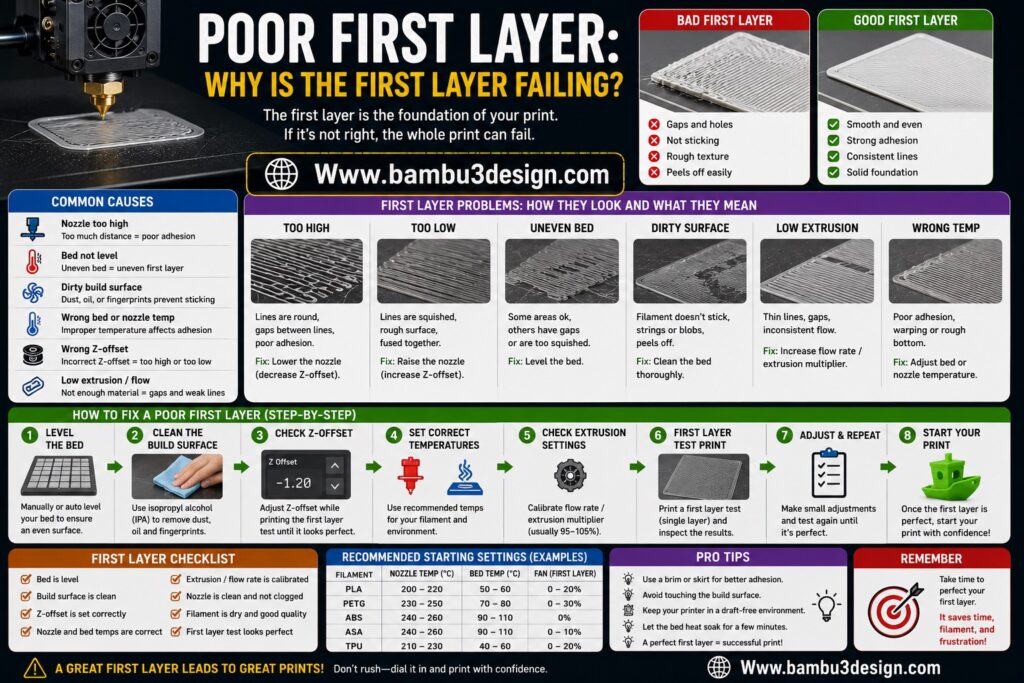
A successful print starts with a perfect first layer. If the nozzle is positioned too close to the build plate, filament can become excessively compressed. If it is too far away, the filament may not adhere properly, leading to poor bed adhesion and print failure.
To correct this issue, carefully adjust the Z-offset and verify that the bed is level. A properly calibrated first layer should appear smooth, consistent, and slightly compressed against the build surface.
3dRD-Specific Solution:
Use the traditional paper test to manually calibrate all four corners of the build plate. This simple method remains one of the most effective ways to achieve accurate bed leveling.
Extruder Clicking Noise: Why Does the Extruder Make Clicking Sounds?
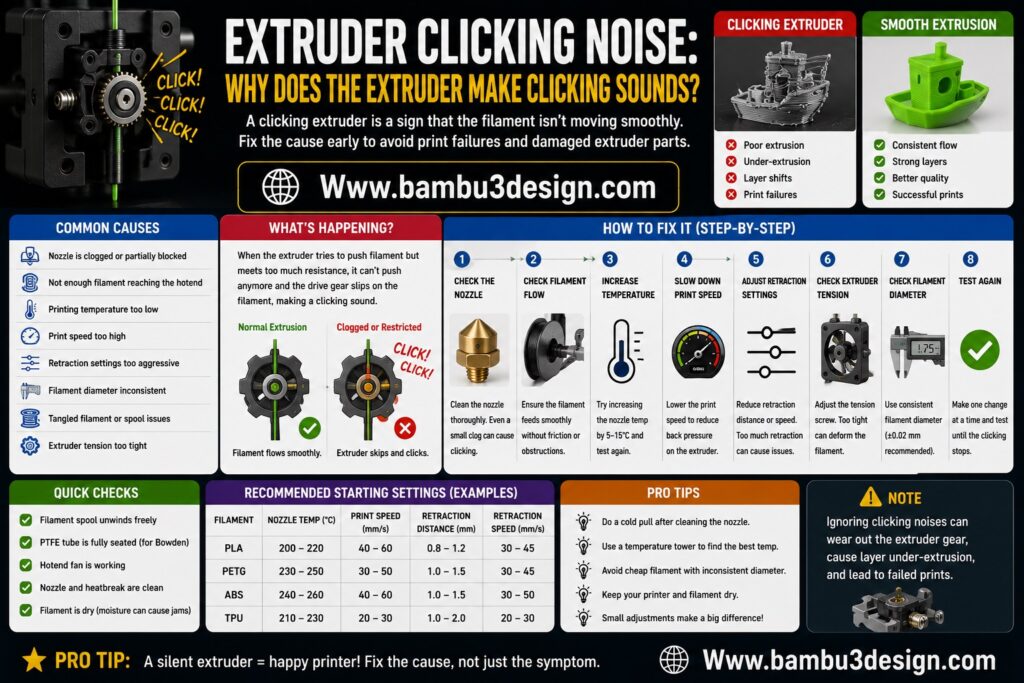
A clicking extruder is usually a sign that the motor is struggling to push filament through the hotend. Common causes include a partially clogged nozzle, excessive resistance in the Bowden tube, incorrect temperature settings, or excessive tension on the extruder arm.
Start by checking the entire filament path, including the Bowden tube, nozzle, and extruder gear. Ensure the filament moves freely and that the hotend is operating at the correct temperature.
3dRD-Specific Solution:
Slightly loosen the tension adjustment screw on the extruder arm. Excessive pressure can deform the filament and increase feeding resistance, leading to skipped steps and clicking noises.
Elephant’s Foot: Why Does the Bottom of the Print Bulge Outward?
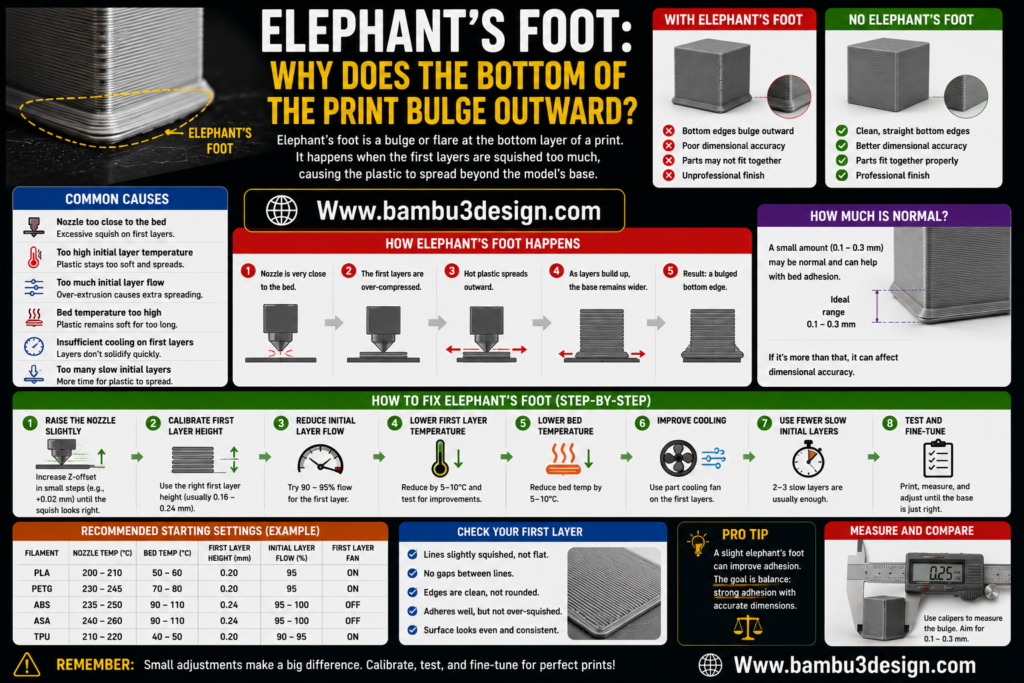
Elephant’s Foot occurs when the lower layers of a print become wider than intended, creating a noticeable bulge at the base of the model. This defect is usually caused by excessive bed temperature, an overly compressed first layer, or incorrect Z-offset settings.
Reducing the bed temperature slightly and fine-tuning the first-layer height are often enough to eliminate this problem. Proper bed leveling is also essential for achieving accurate dimensions.
3dRD-Specific Solution:
Avoid over-compressing the first layer against the build plate. Maintaining a balanced first-layer squish will improve dimensional accuracy while preserving good bed adhesion.
Z-Wobble: Why Are Vertical Lines Appearing on the Surface?

Z-Wobble appears as repeating horizontal bands or vertical surface artifacts along the height of a printed object. The most common causes include bent lead screws, misaligned Z-axis components, loose couplings, or frame instability.
Inspect the lead screw for straightness, tighten all mounting hardware, and verify that the Z-axis moves smoothly throughout its entire travel range. Proper alignment is essential for achieving clean vertical surfaces.
3dRD-Specific Solution:
Check the Z-axis motor coupling and ensure the printer frame is properly squared and aligned. Correcting these mechanical issues can significantly reduce unwanted vibrations and improve surface quality.
Filament Breakage: Why Does Filament Snap During Printing?
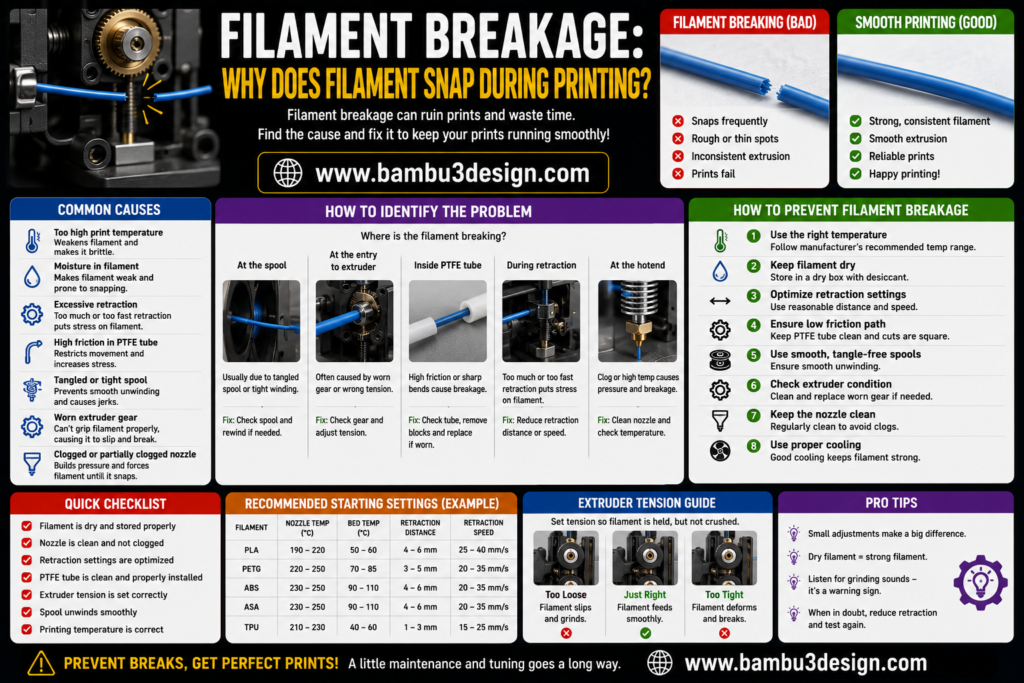
Filament breakage is often caused by moisture absorption, poor filament quality, excessive tension in the filament path, or improper storage conditions. Moisture makes filament brittle, increasing the likelihood of cracking or breaking during extrusion.
To prevent filament breakage, store filament in a dry environment using airtight containers or filament dryers. Regularly inspect the filament path to ensure smooth feeding without excessive resistance.
3dRD-Specific Solution:
Reduce the pressure applied by the extruder drive gear. Excessive tension can deform and weaken the filament, increasing the risk of breakage during printing.
Sudden Print Stop: Why Does a Print Fail Midway?
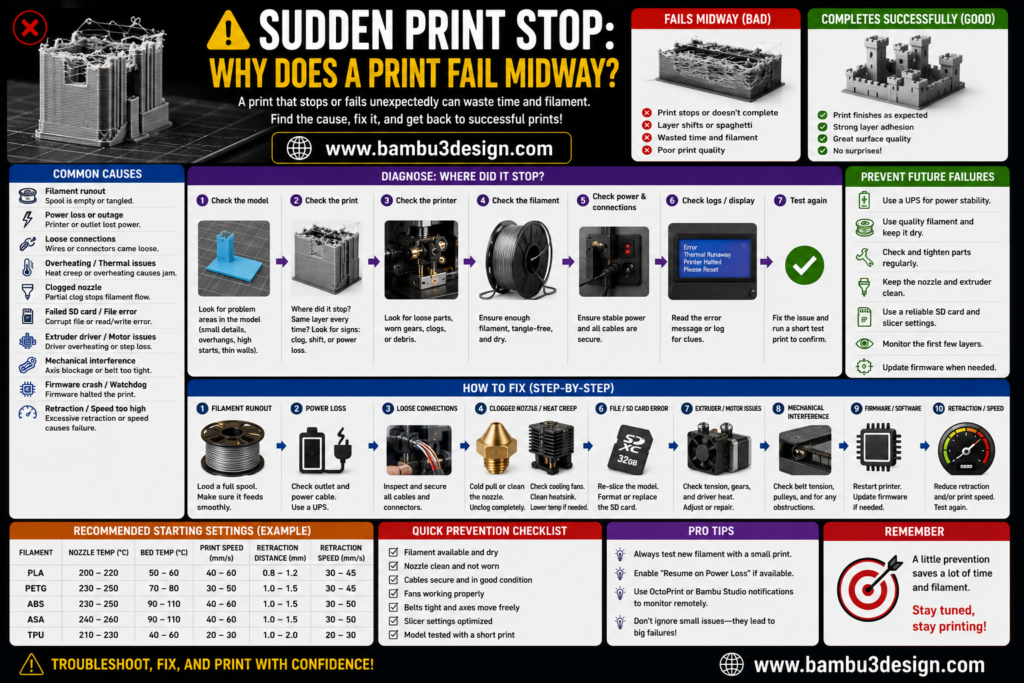
A print that suddenly stops can be caused by power interruptions, corrupted G-code files, unstable connections, or hardware communication errors. Such failures often result in wasted material and long print times.
To reduce the risk of unexpected interruptions, use a reliable power source, install a surge protector, and verify that your G-code file is not corrupted before starting a print.
3dRD-Specific Solution:
Inspect the flat ribbon cable connections behind the display module. Loose or intermittent connections can occasionally interrupt printer operation and cause unexpected print failures.
Blobs and Zits: Why Are There Small Bumps on the Surface?
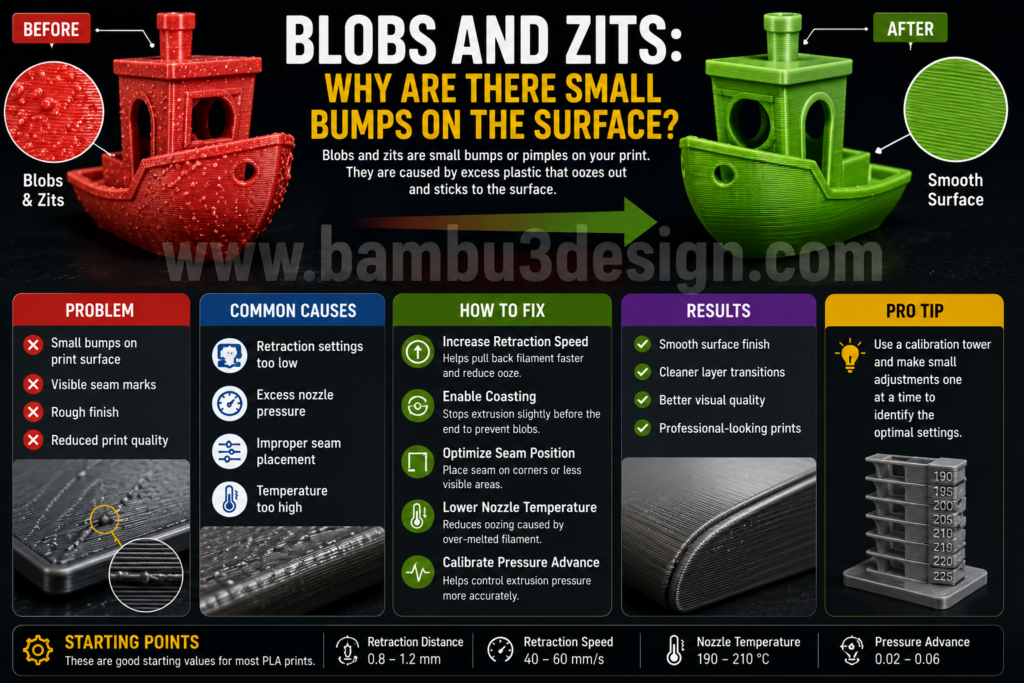
Blobs and zits appear as small surface imperfections caused by improper seam placement, pressure buildup inside the nozzle, or poorly tuned retraction settings. These defects are especially visible on curved or decorative models.
To improve surface quality, optimize seam positioning and enable features such as coasting and pressure compensation within your slicer.
3dRD-Specific Solution:
Adjust the retraction speed to approximately 40–60 mm/s. Proper retraction settings help minimize excess material accumulation and improve surface finish.
Ghosting (Ringing): Why Are Shadow-Like Patterns Appearing on the Print?
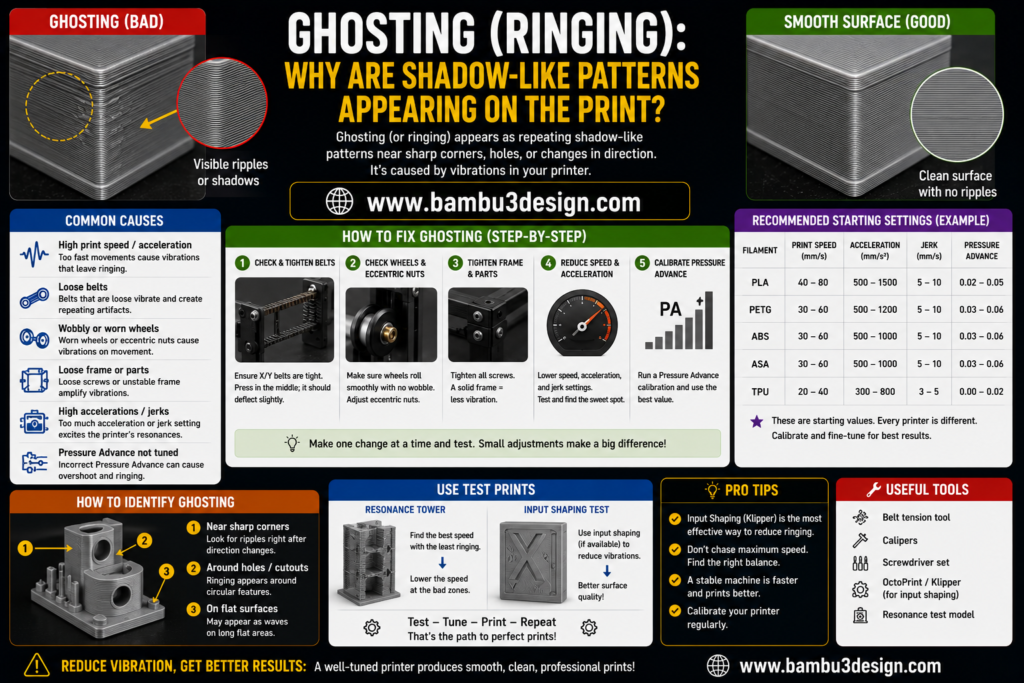
Ghosting, also known as ringing, appears as repeated ripple-like patterns near sharp edges and corners. It is caused by mechanical vibrations generated during rapid direction changes at high print speeds.
Reducing print speed, acceleration, and jerk settings can significantly improve print quality. Mechanical stability is equally important for minimizing vibration.
3dRD-Specific Solution:
Inspect and tighten all frame, carriage, and enclosure screws. A rigid frame reduces resonance and improves dimensional accuracy.
Layer Separation (Delamination): Why Are Layers Splitting Apart?
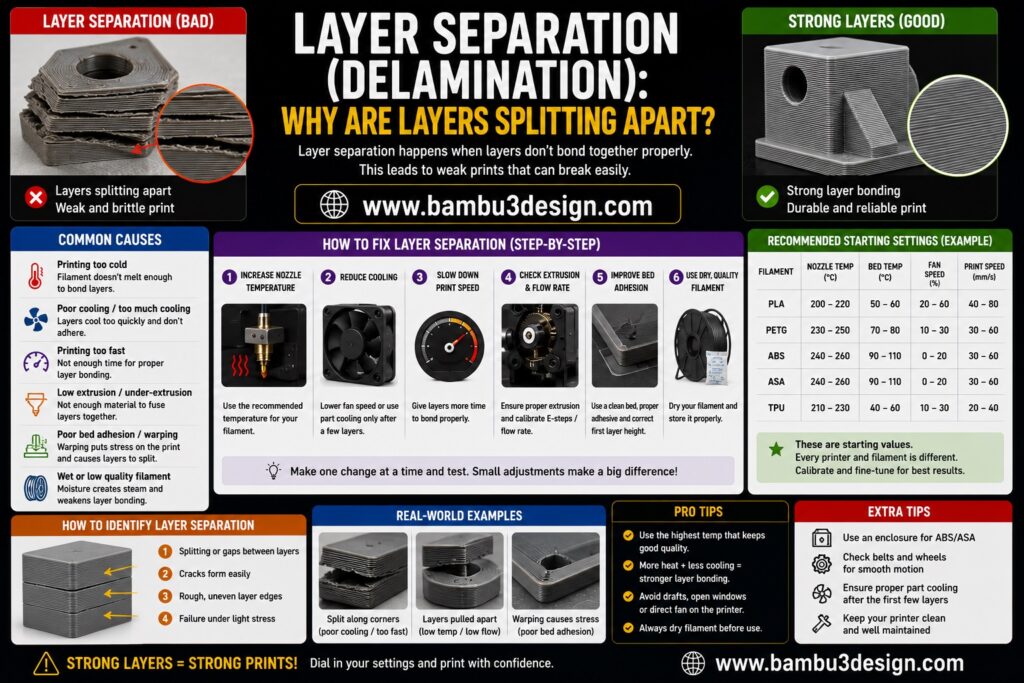
Layer separation occurs when adjacent layers fail to bond properly, resulting in weak parts and visible cracks. This issue is commonly caused by low nozzle temperatures, excessive cooling, or printing materials that are sensitive to temperature fluctuations.
Increasing nozzle temperature and reducing cooling fan speed can improve interlayer adhesion and strengthen printed parts.
3dRD-Specific Solution:
For large parts and engineering materials, use an enclosure to maintain a stable printing environment and minimize thermal stress.
Pillowing: Why Are There Holes on the Top Surface?
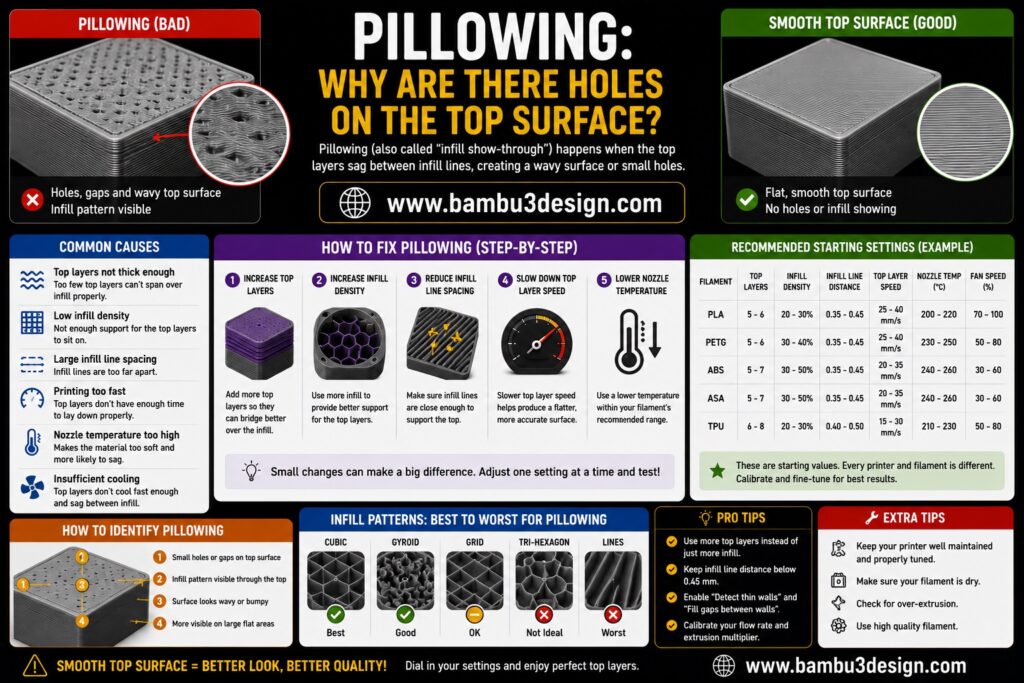
Pillowing appears as small holes or uneven patches on the top layers of a print. It is usually caused by insufficient top layers, inadequate infill support, or poor cooling performance.
Increasing the number of top layers and optimizing infill density often eliminates this problem and produces smoother surfaces.
3dRD-Specific Solution:
Upgrade or improve nozzle cooling performance to help top layers solidify properly and achieve a cleaner finish.
Support Failure: Why Are Supports Collapsing During Printing?
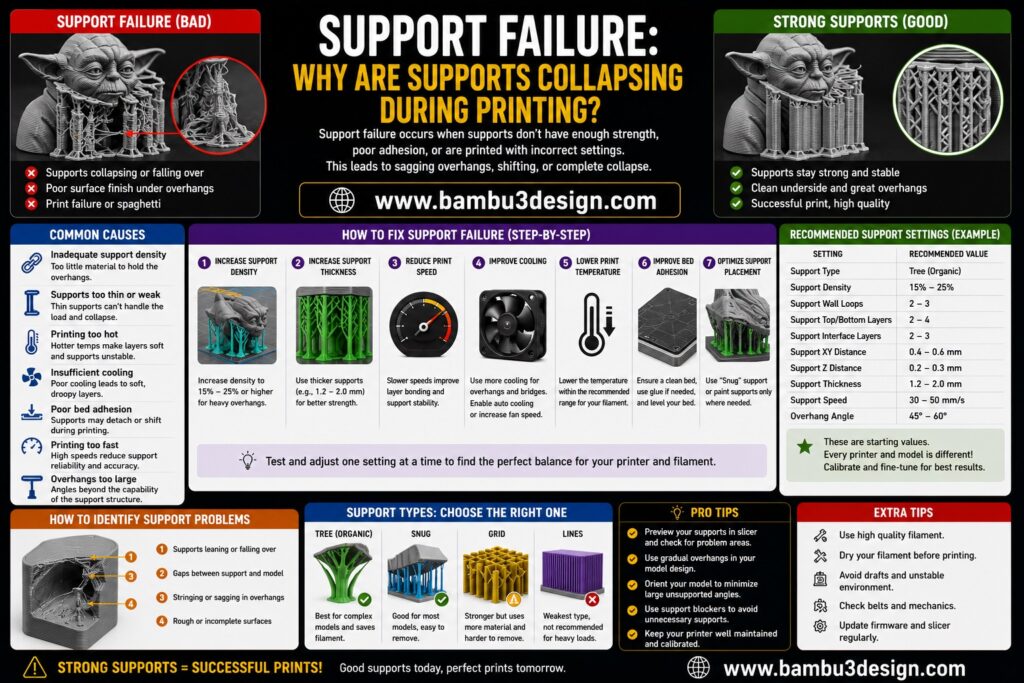
Support structures can fail when support density is too low or when the vertical support gap is improperly configured. Failed supports often lead to poor overhang quality or complete print failure.
Increasing support density to at least 15% and carefully tuning support settings can improve support stability.
3dRD-Specific Solution:
Set the support Z-gap close to the layer height used in the print. This provides a good balance between support strength and easy removal.
Stepper Driver Whine: Why Are the Stepper Drivers Making Noise?
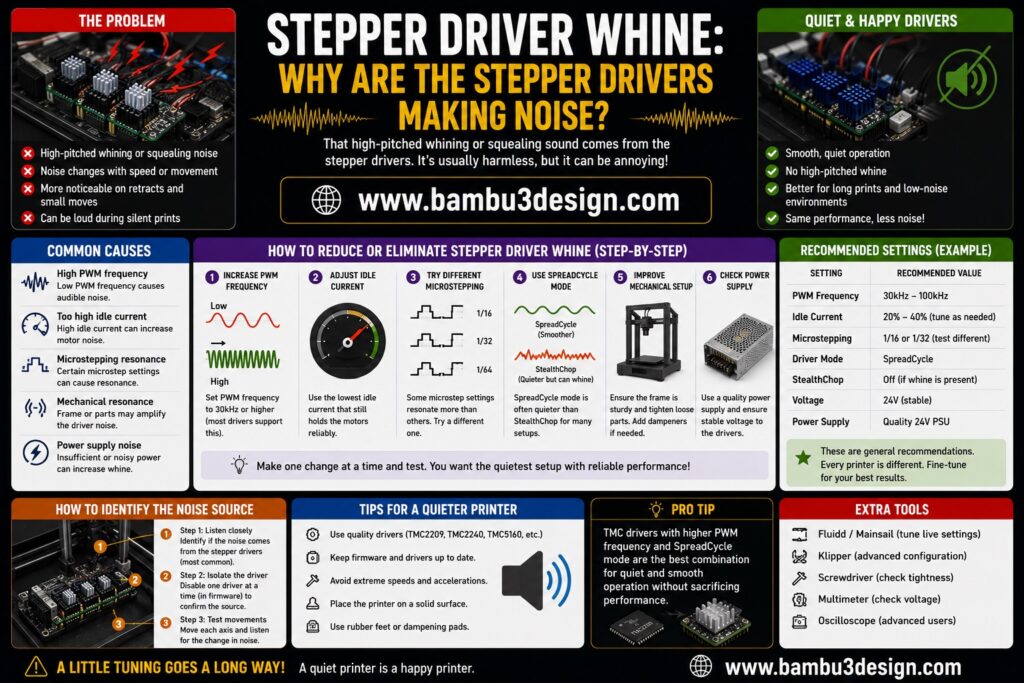
A high-pitched whining sound from the stepper drivers is often caused by incorrect motor current settings or inadequate cooling of the control board. Excessive heat can also affect driver performance and reliability.
Checking and adjusting the driver reference voltage (Vref) is an important step in resolving this issue.
3dRD-Specific Solution:
Verify that the mainboard cooling fan is operating correctly and providing sufficient airflow to the stepper drivers.
Cold Extrusion: Why Isn’t the Filament Melting Properly?
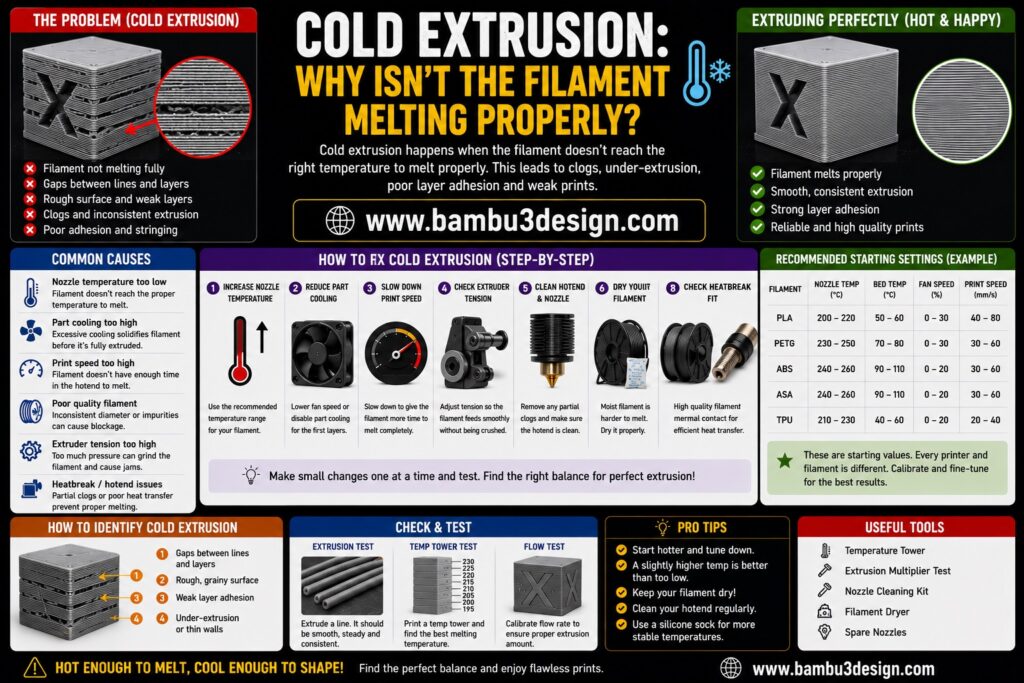
Cold extrusion occurs when the printer attempts to extrude filament below the required melting temperature. Faulty thermistors, damaged wiring, or incorrect temperature readings are common causes.
Inspect the temperature sensor and wiring, and replace faulty components if temperature readings appear inaccurate.
3dRD-Specific Solution:
Check all electrical connectors leading to the print head assembly to ensure a stable and secure connection.
Z-Banding: Why Do Prints Show Repeating Horizontal Lines?
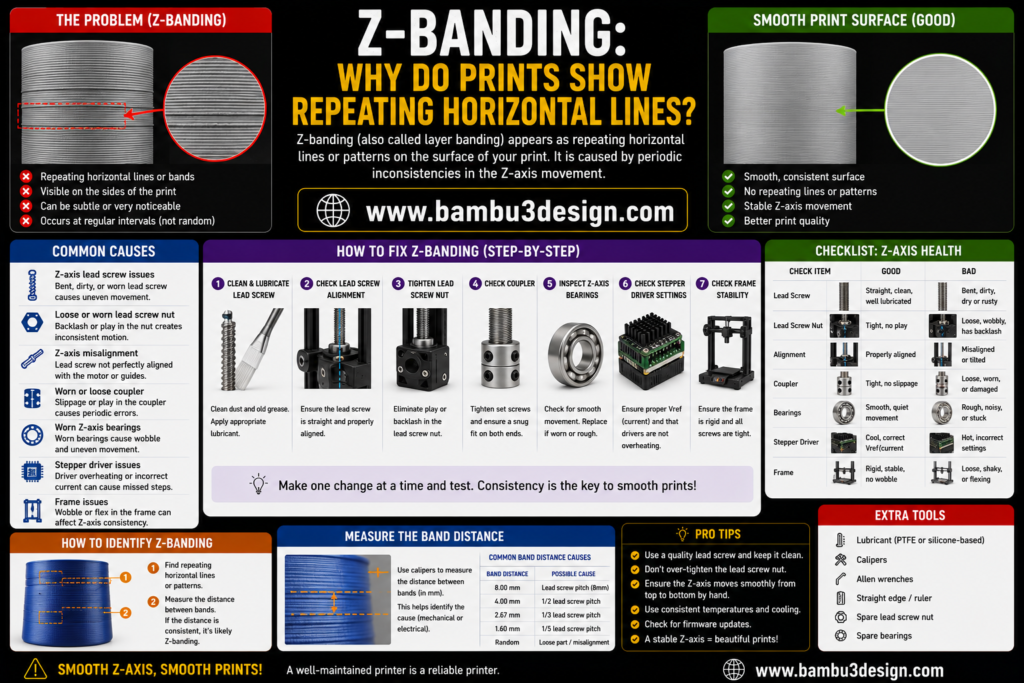
Z-banding appears as regularly spaced horizontal lines on the surface of a print. It is often caused by dirty, bent, or poorly lubricated lead screws that affect smooth Z-axis movement.
Regular cleaning and lubrication of the lead screw can greatly improve print quality. This issue is especially noticeable on statues, figurines, and decorative models.
3dRD-Specific Solution:
Use flexible motor couplers on the Z-axis to absorb minor misalignments and reduce vibration-related artifacts.
Dimensional Inaccuracy: Why Are Printed Parts the Wrong Size?
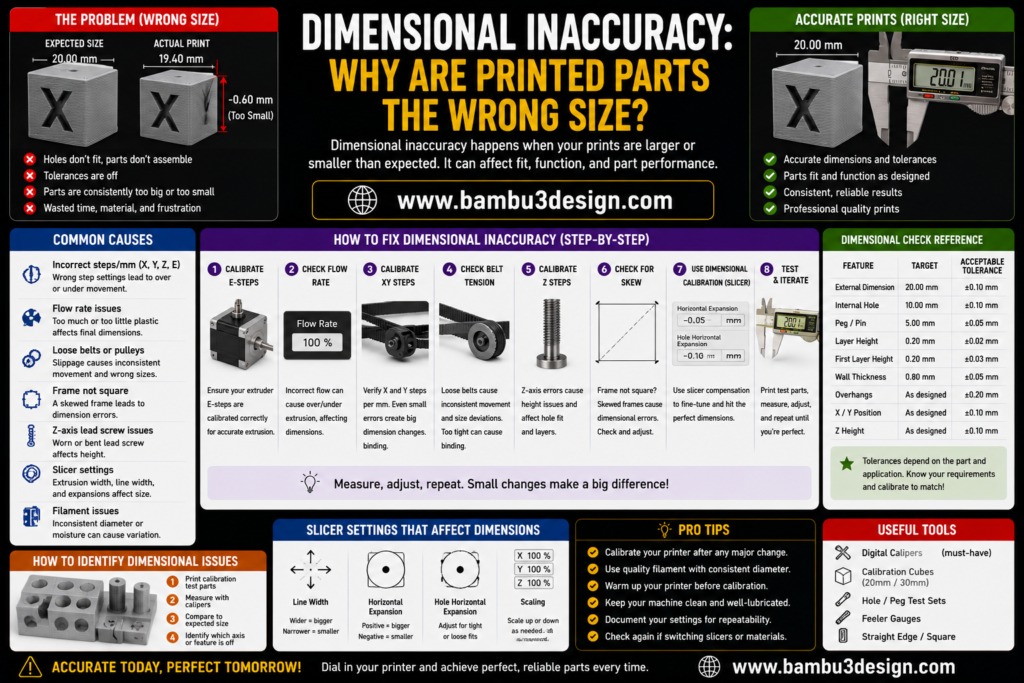
Dimensional inaccuracies occur when the printer’s motion system is not properly calibrated. Incorrect step/mm values can cause printed parts to be larger or smaller than intended.
Calibrating the X, Y, and Z axes is essential for achieving precise dimensions and reliable mechanical fits.
3dRD-Specific Solution:
Print and measure a 20 mm calibration cube using a digital caliper, then adjust the step/mm values accordingly for maximum accuracy.
Cooling Fan Failure: Why Did the Cooling Fan Stop Working?
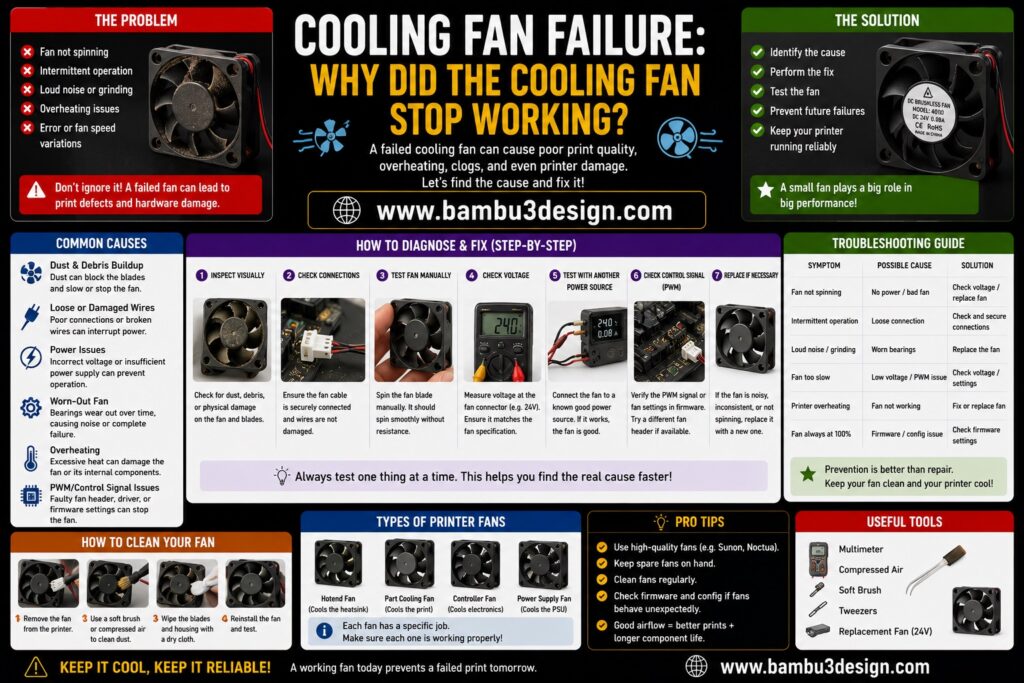
Cooling fans can fail due to poor manufacturing quality, excessive dust buildup, worn bearings, or electrical issues. A failed cooling fan can lead to overheating, poor surface quality, and thermal problems.
Replacing faulty fans with high-quality alternatives is often the best long-term solution.
3dRD-Specific Solution:
Verify that the fan wiring is secure and properly connected. A reliable electrical connection helps maximize fan lifespan and cooling performance.
Final Thoughts
Understanding and solving common 3D printing problems is one of the most important skills every maker can develop. While modern printers are more reliable than ever, issues such as poor adhesion, stringing, layer shifting, clogging, dimensional inaccuracies, and cooling failures can still affect print quality and waste valuable time and material.
The key to successful troubleshooting is identifying the root cause rather than relying on trial and error. By making small, controlled adjustments and testing one parameter at a time, you can quickly diagnose problems and achieve consistent, high-quality results.
Remember that every printer, filament, and printing environment is different. What works perfectly for one setup may require fine-tuning for another. Regular maintenance, proper calibration, quality materials, and optimized slicer settings will significantly reduce failures and improve overall print performance.
Whether you’re a beginner creating your first model or an experienced maker producing functional parts, mastering these troubleshooting techniques will help you print with greater confidence, accuracy, and reliability.
Happy Printing! 🚀
For more 3D printing guides, tutorials, troubleshooting tips, and printer reviews, visit:
Frequently Asked Questions (FAQ)
Why does my 3D printer filament keep breaking?
Filament breakage is often caused by moisture absorption, poor storage conditions, excessive tension in the filament path, or low-quality filament. Store filament in a dry environment and ensure the extruder tension is properly adjusted. Using high-quality filament can significantly reduce breakage issues.
Why does the filament become flattened or chewed by the extruder gear?
This usually happens when the extruder tension is too high, causing the drive gear to grind into the filament. Check the extruder tension, inspect the drive gear for wear, and replace damaged filament if necessary.
Why is the dimensional accuracy of my 3D prints poor?
Dimensional inaccuracies are typically caused by incorrect calibration of the X, Y, and Z axes, improper slicer settings, or worn mechanical components. Perform axis calibration and verify that belts, pulleys, and motion components are functioning correctly.
Why are printed circles not perfectly round?
Loose belts, excessive print speed, mechanical play, or poor motion calibration can affect circular accuracy. Tighten the belts, verify pulley alignment, and lubricate bearings to ensure smooth and precise movement.
Why doesn’t my printer reproduce fine details accurately?
For higher detail quality, reduce the layer height to approximately 0.10–0.15 mm, lower the print speed, and use a high-quality filament. Fine details also benefit from a properly calibrated printer and optimized cooling settings.
Why are the outer surfaces of my prints rough or uneven?
Surface imperfections are often caused by excessive print speed, unstable temperatures, mechanical vibrations, or improper extrusion settings. Reducing print speed and ensuring stable printer operation can greatly improve surface finish.
Why does my 3D model appear to melt or deform after printing?
This issue is usually caused by insufficient cooling, excessive nozzle temperature, or poor thermal management. Check that all cooling fans are operating correctly, optimize cooling settings, and maintain a stable printing environment to prevent heat-related deformation.