Upgrade your Bambu Lab P1S with a replaceable-nozzle hotend and make nozzle changes easier, faster, and more convenient!
Are you tired of replacing the entire hotend assembly whenever you want to change nozzle sizes on your Bambu Lab P1S?
In this step-by-step tutorial, I’ll show you how to upgrade your printer with an alternative hotend design that allows you to replace only the nozzle instead of the complete hotend assembly.
The video covers the entire installation process, from removing the original hotend and assembling the upgraded components to installing a 0.2 mm nozzle and testing the printer.
This upgrade is particularly useful for makers who frequently switch between nozzle sizes for detailed prints, everyday projects, and larger 3D-printed models.
Why Upgrade the Bambu Lab P1S Hotend?
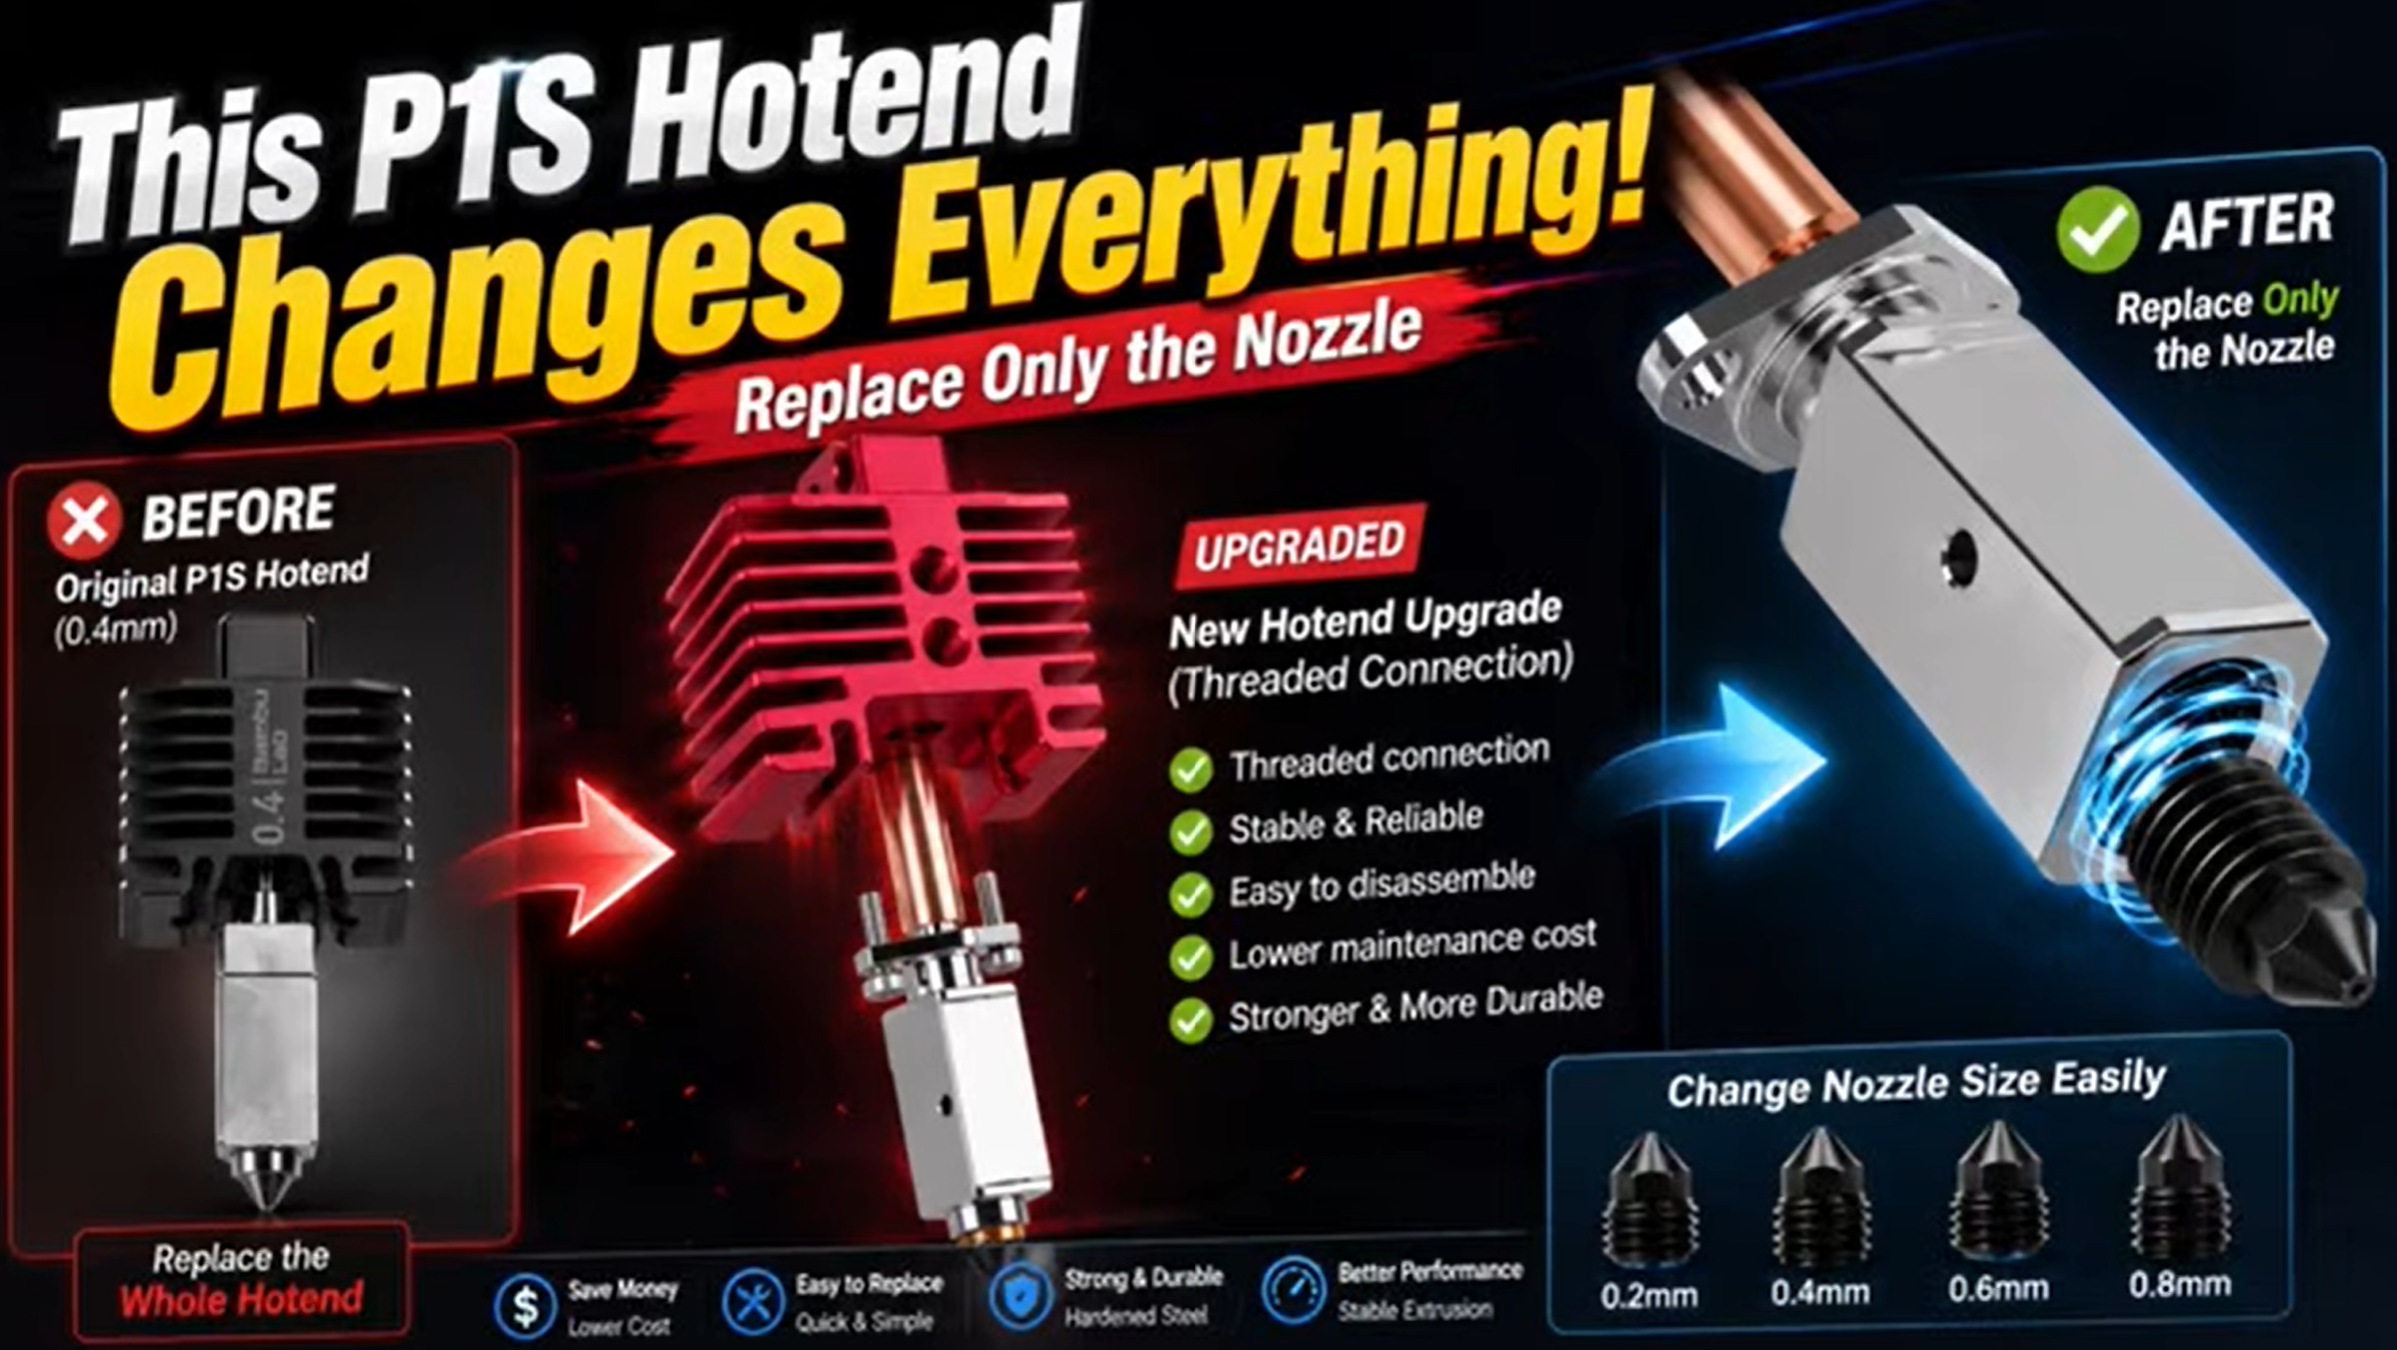
The standard Bambu Lab P1S hotend uses an integrated nozzle design, which means nozzle changes generally involve replacing the hotend assembly.
With a compatible replaceable-nozzle hotend upgrade, you can change the nozzle separately while keeping the main hotend components.
This offers several practical advantages:
- Easier Nozzle Replacement: Change the nozzle without replacing the entire hotend.
- Multiple Nozzle Sizes: Switch between supported 0.2 mm, 0.4 mm, 0.6 mm, and 0.8 mm nozzles.
- Greater Flexibility: Choose a nozzle diameter based on the required detail, extrusion width, and printing speed.
- Potential Cost Savings: Replace individual compatible nozzles instead of purchasing a complete hotend assembly.
- Customizable Printing Setup: Adapt your printer to different project requirements.
Supported Nozzle Sizes
The upgraded hotend supports compatible interchangeable nozzles in the following sizes:
0.2 mm Nozzle
Suitable for fine details, small features, miniature models, and delicate decorative prints.
0.4 mm Nozzle
A versatile choice for everyday 3D printing, offering a balance between detail and printing time.
0.6 mm Nozzle
Useful for larger prints, wider extrusion lines, and applications where high levels of fine detail are less important.
0.8 mm Nozzle
Designed for wider extrusion lines and larger printed features, with potential printing-time benefits when the printer’s flow capacity allows.
What You’ll Learn
In this tutorial, I’ll show you:
- How to remove the original Bambu Lab P1S hotend.
- How to prepare and assemble the upgraded hotend.
- How to install the heatbreak and heatsink.
- How to fit the heater and thermistor.
- How to install the hotend cooling fan.
- How to install a replaceable 0.2 mm nozzle.
- How to reinstall the upgraded hotend on the printer.
- How to reconnect the electrical components.
- How to load filament and check extrusion.
- How to prepare the printer for printing with the new nozzle.
Step 1: Remove the Original P1S Hotend
Before beginning the installation, switch off the printer, disconnect it from the power supply, and allow the hotend to cool completely.
Carefully remove the toolhead cover and access the original hotend assembly.
Disconnect and remove the relevant components as demonstrated in the video.
Step 2: Assemble the Upgraded Hotend
Prepare the replacement hotend components.
Install the heatbreak and heatsink, ensuring they are assembled correctly according to the hotend manufacturer’s instructions.
Next, install the heater, thermistor, and cooling fan.
Check that the components are securely positioned and that the electrical connections are compatible with your printer.
Step 3: Install the Replaceable Nozzle
One of the main advantages of the upgraded hotend is its interchangeable nozzle design.
For this tutorial, I’m installing a 0.2 mm nozzle, which is particularly useful for printing small details and fine features.
Follow the manufacturer’s instructions for nozzle installation and tightening, including the required temperature and torque where applicable.
Step 4: Reinstall the Hotend on the Bambu Lab P1S
After assembling the upgraded hotend, carefully reinstall it into the printer.
Reconnect the heater, thermistor, and fan.
Ensure the hotend is properly secured and that the wiring is correctly positioned before reassembling the toolhead.
Step 5: Test the Upgraded Hotend
Once the installation is complete, turn on the printer and check that the hotend temperature is being measured correctly.
Load filament and test the extrusion to confirm that the nozzle is working as expected.
Before printing, select the correct nozzle diameter and compatible settings in Bambu Studio.
You may also need to review the temperature, flow rate, and calibration settings depending on the replacement hotend and nozzle.
Watch the Full Step-by-Step Tutorial
I’ve created a complete YouTube tutorial demonstrating the entire Bambu Lab P1S hotend upgrade process.
The video covers removal, assembly, nozzle installation, reinstallation, and final extrusion testing.
Watch the full tutorial on my YouTube channel: Bambu3Design!
Hotend and Nozzle Components
Want to try this upgrade on your own Bambu Lab P1S?
You can find the hotend and compatible nozzle options through the product links provided in the YouTube video description.
Important: Check compatibility with the Bambu Lab P1S before purchasing. This tutorial demonstrates an alternative hotend upgrade and does not establish compatibility with every third-party hotend or nozzle.
Important Safety Information
Always switch off and unplug the printer before disconnecting or installing hotend components, and allow them to cool completely.
Follow the replacement hotend manufacturer’s instructions for nozzle tightening, electrical compatibility, heater and thermistor installation, and temperature limits.
Some replaceable nozzles require hot tightening. Perform this only as specified by the manufacturer, using appropriate tools and precautions.
Incorrect installation can result in filament leakage, electrical faults, overheating, or damage to the printer.
Is This Hotend Upgrade Worth Trying?
If you frequently switch between different nozzle sizes, a compatible replaceable-nozzle hotend can make your 3D printing workflow more flexible.
Instead of replacing the entire hotend assembly, you can use compatible individual nozzles for different projects.
The actual convenience, print quality, and cost savings depend on the quality and compatibility of the selected upgrade.
Upgrade Your Bambu Lab P1S!
This project is a great way to explore the hardware behind your 3D printer and customize it for different printing requirements.
Whether you’re printing fine-detail models with a 0.2 mm nozzle or experimenting with larger nozzle sizes, this upgrade provides another option for adapting your Bambu Lab P1S.
Explore more Bambu Lab upgrades, 3D printing tutorials, DIY electronics, and creative projects at Bambu3Design!
Don’t forget to subscribe to my YouTube channel for more step-by-step tutorials, practical modifications, and 3D printing projects.
Happy Printing!